Thursday, 30 August 2012

Rainbow sprinkle cake

I was looking back on the special occasion cakes that I have made for my little darlings and I'd have to say this one was extra special. Not because it was for one of my babies but because it was the biggest cake that I have actually made and for a cake with no egg yolks, it was so light and moist and I thought it tasted great. Like my obsession for chocolate I seem to have a slight thing for butterflies! (One of the other birthday cakes I have posted, also had butterflies on it but they were edible).

This cake definitely has the "wow" factor look about it and the beauty of it is you could just opt for two layers if you were just that little bit scared about dealing with the height of the cake (Betty, I know you would love one this high for your little man......maybe with some kind of owl on it perhaps?).

I found the directions very easy to follow and the actual baking of the cake was so simple. Probably the hardest part of the cake was the icing part and blending the two colours just so it has that ombre effect (the latest craze sweeping across the universe of cake land - meaning shades of colours descending from either light into dark shades or vice versa).

This recipe was found in Donna Hay's latest kids issue and just so happened to co-ordinate perfectly with my Miss 5 turning 6's ballerina/fairy themed party! Let's just say there was A LOT of PINK. I will en devour to post some pictures of my efforts and hopefully you might see some ideas for your next party!


You will need:     cake mixture
2 cups (500ml) milk, at room temperature
12 eggwhites
2 teaspoons vanilla extract
4 1/2 cups (675g) plain (all-purpose) flour, sifted
2 tablespoons baking powder, sifted
3 1/2 cups (770g) caster sugar (superfine)
340g butter, softened
1/3 cup coloured sprinkles
cream cheese icing
150g butter, softened
750g cream cheese, softened
3 cups (480g) icing sugar mixture, sifted
pink food colouring

Preheat your oven to 175 degrees (345F). Divide the ingredients for the cake mixture into 2 equal batches. (I guess this is where you can decide if you would rather just make half instead of the whole mixture).
To make the first batch, place the milk, eggwhites and vanilla in a bowl and lightly whisk to combine. Set aside. (Make sure you read the recipe as it states the milk to be at room temperature)


Place the flour, baking powder and sugar in an electric mixer and mix on low speed until combined. Add the butter and beat until mixture resembles fine, moist crumbs.


Increase speed to medium and gradually add the milk mixture, beating for 2 minutes or until just combined.


Divide half the first batch of cake mixture between 2 x 20cm-round lightly greased cake tins lined with non-stick baking paper, reserving the remaining mixture.


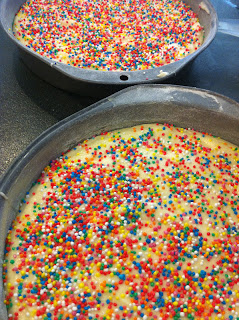
Sprinkle each cake with 1 tablespoon coloured sprinkles and spoon over the remaining mixture. (Now this is where I made the mistake and didn't read the recipe correctly......yes I know B your rolling your eyes. I just sprinkled the 100's of 1000's just on top of the cake mixture instead of in between, so my pictures will show the sprinkles sitting on top of the final baked cake).


Bake for 35-37 minutes or until cooked when tested with a skewer. Allow cakes to cool in the tins for 10 minutes before turning out onto wire racks to cool completely.


To make the second batch, repeat the method above using the remaining cake mixture ingredients.


To make the cream cheese icing, place the butter and cheese in an electric mixer and beat for 6-8 minutes or until pale and creamy.


Add the icing sugar and beat for a further 6-8 minutes or until pale and fluffy.


Divide the icing into two bowls. Add a few drops of pink food colouring to one bowl and stir to combine.


To assemble the cake, trim the tops from the four cakes and discard. Layer each cake with 3/4 cup white icing to create 1 x 4-layer cake.


Using a palette knife, ice the bottom half of the cake with the white icing. Run a palette knife around the sides of the cake to blur the icing. Refrigerate for 30 minutes or until icing is just set.


Decorate with your butterflies.


I really enjoyed putting this cake together! Enjoy M x

Tuesday, 28 August 2012

Ham, leek and cheddar impossible pie

The word "impossible" is definitely the opposite for this pie. If you're looking for one of those quick and easy mid-week meals or perhaps like we were on this particular day, a lazy Sunday afternoon late lunch. We don't usually go all out and make hot lunches every weekend but the kids were sick of the same old ham and cheese sandwiches and with the weather being a little chilly here in Oz, this warm pie filled that empty spot (I think the kids have endless bottomless pits in their stomachs).

A great little recipe for all that extra ham at Christmas time also and I guess you could add some extra's to accommodate your own tastes. It was very easy and quick and I actually came across this one in one of my Donna Hay Kids issues. Of course I told my number 1, 2 and 3 that it was from a 'kids' recipe book and in their minds that already ticked a major box!! My three cherubs tend to try things if they can see the ingredients before it goes into the actual dish and a big plus about it being from a kids issue is that in their minds it must be okay because other kids eat it!!! (If only they knew). I can happily say all 3 tried this one and 2 out of 3 thumbs up (can't expect much from Miss newly turned 6 at the moment).

Does anyone else have that one little fussy eater residing in their house?


You will need:
1 tablespoon olive oil
2 leeks, trimmed and thinly sliced
1 clove garlic, crushed
sea salt and cracked black pepper
3 eggs
1/2 cup (75g) self-raising flour, sifted
1 1/2 cups (375ml) milk
150g double smoked ham, shredded
1 cup (100g) grated cheddar cheese


Preheat oven to 200 degrees (400F). Heat the oil in a non-stick frying pan over high heat. Add the leek and garlic and cook for 5 - 7 minutes or until golden and softened.


  Sprinkle with salt and pepper and set aside.  Place the eggs and flour in a bowl and whisk well to combine.


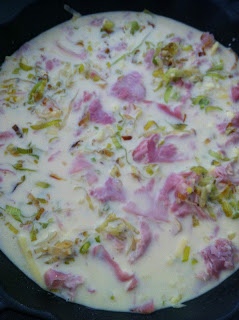
 Gradually add the milk and whisk to combine.  Place the leek, ham and cheese in a lightly greased 24cm-round (1.5 litre-capacity) ovenproof baking dish.


 Pour over the milk mixture, sprinkle with salt and pepper and cover loosely with aluminium foil.  Cook for 30 minutes.


 Uncover, and cook for further 30-35 minutes or until cooked through.


 Allow to stand at room temperature for 10 minutes before slicing. Serve with a simple green salad.


Serves 4  M x

Tuesday, 14 August 2012

Butterfly jam tarts

August is a birthday bonanza at our house and I wanted to share a few different things I made for Miss 6's official party, though you don't need a party to make these beautiful jam tarts! You could also make any shape really - butterflies, fairies and ballerinas featured at this party so the butterfly was a perfect fit. These were a great hit with adults so maybe I don't really need a party for an excuse after all!!!

I had a butterfly cookie cutter and some tiny love heart shaped ones which is what was asked for in this recipe but I don't think my actual butterfly was the exact size that was recommended as I was only able to cut 2 love hearts instead of the required 4 but it still worked fine. I found them easy to make and I loved how the jam mixture, even though exposed through the cut out hearts, didn't ooze out all over the shortcrust pastry and it held it's shape. It really was a novel idea that I spotted in the latest Donna Hay Kids issue and just had to try of course. Who doesn't like eating jam tarts off a stick!


You will need:
1/2 cup (65g) sweetened dried cranberries
1/4 cup (80g) raspberry jam
1 tablespoon caster sugar
4 sheets store-bought shortcrust pastry, thawed
1 egg, lightly beaten
18 wooden sticks (paddle pop sticks I used)
white sugar, for sprinkling

Preheat oven to 180 degrees. Place the cranberries, jam and sugar in a small food processor and process until a rough paste forms.


 Using a 5cm x 7cm butterfly-shaped cookie cutter, cut 36 shapes from the pastry. Using a 1cm x 1.5cm heart shaped cookie cutter, cut 4 heart shapes or 2 like I have above from half the butterflies. Place the whole butterflies on lightly greased baking trays lined with non-stick baking paper. Spoon 1 teaspoon of the jam mixture into the centre of each whole butterfly and brush the edges with egg. Lightly press a wooden stick onto the base of each butterfly and top with the remaining butterfly shapes.


 Press the edges to seal, brush with egg, and sprinkle with white sugar. Bake for 15-17 minutes or until light and golden. Allow to cool on the trays before serving.


Enjoy! Mx


Sunday, 12 August 2012

Melt and Mix Chocolate Coconut Cake - My Birthday Girl!

It was one of those weeks in our household where I needed an easy option for a birthday cake as I think I have mentioned before that birthdays in the M household are all extremely close together. In fact, Miss 11 and Miss 6 are only one day apart from each other!! This year Miss 6 was having her first official party with her little friends from school, but over the last few years, Miss 11 has had to share one or two cakes with her younger sister. With that in mind I set about trying to find something fast and simple that Miss 11 could take to school and feel special with. This particular cake was from two different books both being Donna Hay ones. The Kit Kats and the M and M's caught my attention for the "simple" part I was after and I can't actually recall which of my many books this came from but the actual cake under all those yummy chocolates was from a very well used Donna Hay book that I use often, called "Donna Hay - Modern Classics - Book 2". The cake itself was a first for me and just as simple as the decorations but extremely yummy (Miss 11 brought home one remaining piece that I was allowed to sample). It tasted like a Golden Rough and the combination of chocolate and coconut was down right delicious (even if I do say so myself).

The cake tin I used was a 24cm round cake tin but the beauty of this cake is that you could make it as big or small as you want and yes you could do something that I personally would NEVER do and use a packet mix for your actual cake (not mentioning any names but you know who you all are - packet queen peeps!!). In saying that the bigger the cake the more KitKats you will need, I had to buy 3 packets of the snack size Kitkats as it took 24 of them and there is only 11 in each packet (I most probably needed 3 packets regardless as you all know my fetish for chocolate). You only need one packet of the mini mm's but it's the large packet that I bought.


You will need:
250g melted butter
3/4 cup sifted cocoa powder
1 1/3 cups caster sugar
3 eggs
1 1/2 cups desiccated coconut
1 1/2 cups plain flour
1 1/2 teaspoon baking powder
3/4 cup of milk

Preheat your oven to 180 degrees and grease your 24 cm round cake tin. Melt your butter and place it a large bowl.


Add your sifted cocoa powder, caster sugar, eggs, desiccated coconut, plain flour, baking powder and milk to your melted butter and whisk until smooth.


Pour into your greased tin and bake for 50 minutes.


After your cake is cool,  ice and serve or if you don't want to put all those decorations on it you can dust with cocoa powder and serve warm or cold with thick cream!
I don't have a recipe for the icing I have made as I tend to make most of my icing just from my head and a way that I was taught by my Mother which just involves icing sugar, a knob of butter and some milk to combine it together (for chocolate just add cocoa powder).


YUM!! M x