Showing posts with label Biscuits. Show all posts

Tuesday, 1 January 2013

Rudolf the red-nosed reindeer cookies - M & B Christmas recap

I love Christmas time. In fact sometimes I have to remind myself that I'm an adult now and I don't need to wake up before the birds are singing on Christmas morning. Just can't help myself, even though the focus is on our children now. I love hearing them sneak down the hall way at some ungodly hour, only to run back down and tell each other "Santa has been!".

I also love baking some little treats that are a little different and that are just for the kids (well big kids also) and seeing their little faces light up as they take bites of my creations. I wanted to make these reindeer cookies for a school break up party but never had time to actually do them so I ended up making some marshmallow snowmen on sticks as shown below.


They were a hit and so easy to make and no baking required. However, back to the biscuits at hand, they were also very easy and I found the dough worked better rested in the freezer instead of the fridge as it was a little harder and easier at holding its shape when transferring from the baking paper to the baking trays. I know some of you are most probably saying "too hard" but you don't have to add the ice-cream sticks or use the decorations I have used as the biscuits themselves are very tasty, they have that hint of spice that will have your taste buds singing Christmas carols all year round!


You will need:
90g butter
1 egg
1/2 cup (110g) firmly packed light brown sugar
1/3 cup (25g) desiccated coconut
1/3 cup (35g) wheat germ
2/3 cup (100g) wholemeal plain (all-purpose) flour
1/3 cup (50g) white self-raising flour
1/2 teaspoon mixed spice
20 small pretzels
1/4 cup (45g) dark choc-bits
10 choc orange balls (I used Jaffas)

Have butter and egg at room temperature. Beat butter, egg and sugar in a small bowl with electric mixer until combined.


Stir in coconut, wheat germ and sifted flours and spice.


Enclose dough in plastic wrap, refrigerate 30 minutes.


Roll dough between sheets of baking paper until 5mm (1/4-inch) thick. Place on tray, refrigerate 30 minutes.
Preheat oven to 180 degrees / 350 F, line baking trays with baking paper.
Using a 9cm (Mine was 8cm) round cutter, cut rounds from dough, re-rolling scraps as necessary. Place rounds about 3-inches apart on trays.


Slide an ice-block stick under each cookie, press down firmly. (You don't have to use ice-cream sticks if you don't want as they biscuits look cute enough without them).


Position two pretzels on each cookie for antlers, press down firmly.


Decorate cookies with choc bits for eyes and mouths, bake about 12 minutes until lightly browned.


Adding your choc orange balls after they have been baked, pressing firmly on the hot biscuit and then leaving to cool completely.


Merry Christmas! M x

Saturday, 7 July 2012

Coconut biscuits

So the Ekka is coming up in Brisbane next month. For those not familiar with the Ekka (short for 'Exhibition') it is Brisbane's Royal Show equivalent, that is, the Ekka is like a big carnival or fun fair (for our overseas readers) complete with carnival rides, animal shows and loads of carnival food (think pluto pups/corn dogs and fairy floss). B has a soft spot for the Ekka and has been almost every year as an adult, visiting her favourite animal and produce displays. However as kids and teenagers visiting with mum and dad, we both have fond memories of the Queensland Butter Board ham and cheese sandwiches, cups of cheerio sausages from the meat hall and of course the iconic strawberry ice-creams (hmmm, that is all food - did we actually do anything else at the Ekka, B?). I always love visiting the cookery and arts/craft displays if I do go as they are the one thing that remains the same. Entries from young and old are displayed proudly with their ribbons (if you're lucky enough to earn one) and for me it is this that gives the Ekka that nostalgic feel of a big country fair that seems to have been swallowed up in so many of the other areas. Kids being kids however still love the Ekka wholeheartedly and it is fun to see it through their eyes.
This recipe comes to us from a lady who is no stranger to cookery competitions and in fact is quite the champion of such events. Merle Parrish is a member of the Country Women's Association (CWA) and these ladies are famous (and fierce!) for their competition cookery. She has recently risen to some fame through her association with Masterchef Australia. Her peach blossom cake is famous because of the show and she has produced her very own old school cook book - Merle's Kitchen. The book pays homage to country fair competition cookery and is definitely serious comfort for winter baking days. Though we haven't entered anything in this year's Ekka, we reckon these coconut cookies of Merle's are a winner. Seriously simple recipe but a cracking bikkie all the same, thanks for sharing your recipes Merle!


You will need:
150g butter, at room temperature, chopped
1 1/3 cups white sugar
1 teaspoon vanilla essense
1 egg
2 cups desiccated coconut
2 1/2 cups self-raising flour
pinch salt

Preheat the oven to moderate (180 degrees) and line two baking trays with baking paper.

Use electric beaters to cream the butter, sugar and vanilla until white and fluffy. Beat in the egg.


Use a wooden spoon to mix in the coconut, then the flour and salt. At this stage my mix was a touch dry so a added a couple of tablespoons of water so the mix came together.


Shape heaped teaspoons of mixture into balls and place onto trays and flatten slightly with your fingers or folk.


Bake for 10 - 12 minutes, until lightly golden. Leave on the trays for 5 minutes to firm up, before transferring to a wire rack to cool.


Friday, 4 May 2012

Chocolate and peppermint creams

Ever been totally stuck on ideas for birthday gifts for that one person who has EVERYTHING and that is very hard to buy for? (a bit like B really. Well, she doesn't have everything but is hard to buy for!). I know when I recieve a homemade gift or a home cooked something I think it's just that little more special and made with love and care. I love giving a home made gift and always love seeing the smile on their face as they take that first bite into something you have worked so hard on......priceless!

I'm pretty sure I have mentioned before how much I love chocolate. My favourite chocolate partner flavour if I had to choose one would be peppermint. Actually anything with a mint flavour is my weakness just like B and her weakness for caramel. These peppermint creams were heavy on the chocolate flavour and were quite a dense texture, they weren't a light crunchy biscuit texture but more like a cake texture with the beautiful peppermint cream joining the two biscuits together. They were very easy to make and I made them as Christmas presents for some family members. My three darlings were impressed but they are impressed by the mere mention of the word "chocolate" so I knew I was on a winner with this one.
Another Donna Hay recipe from issue 60 (which would rate high on my most used list) Dec/Jan 2012 page 182. This issue has lots of biscuit ideas for gifts and I hope you love it just as much as I do.


You will need:
150g butter, softened
1/2 cup (90g) brown sugar
1/2 cup (175g) golden syrup
1 1/2 cups (225g) plain flour, sifted
1/4 cup (25g) Dutch cocoa, sifted
1 teaspoon bicarbonate of baking soda, sifted
200g dark chocolate, chopped
peppermint cream
2 1/2 cups (400g) icing sugar, sifted
1/2 teaspoon peppermint extract
2 tablespoons milk

Place the butter, sugar and golden syrup in an electric mixer and beat for 8-10 minutes or until pale and creamy.

Add the flour, cocoa and bicarbonate of soda and beat until a smooth dough forms.
Add the chocolate pieces and mix until well combined. Refrigerate the dough for 30 minutes or until firm.
Preheat oven to 180 degrees ( 350F). Roll 1 tablespoonful of the dough into balls at a time. Place on baking trays lined with non-stick baking paper and flatten slightly, leaving room to spread.

Bake for 10-12 minutes or until the tops are cracked. Allow to cool on wire racks.
To make the peppermint cream, place the icing sugar, peppermint extract and milk in a bowl and beat with a hand-held electric mixer for 3-4 minutes or until smooth.

Spread half the biscuits with the peppermint cream and sandwich with remaining biscuits.

Enjoy! M x

Thursday, 15 December 2011

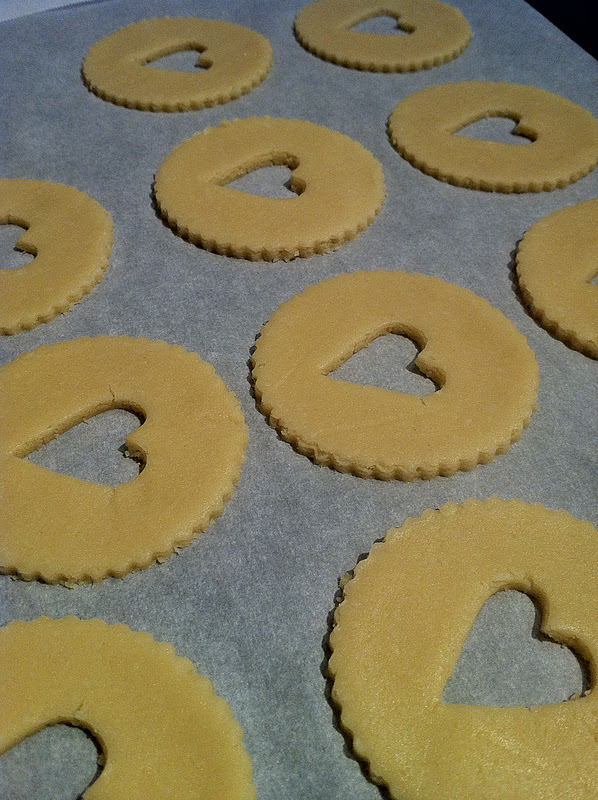
Coconut and Jam Hearts - more Christmas baking

One morning last week B rang me and said 'Have you seen the new Donna Hay?' knowing full well that she had the advantage of downloading the fandangled iPad version. It was the very first morning the latest magazine went on sale and it was before the shops had opened so of course I had not had a chance to get down to the shops to check it out. It's no secret that both B and I have a little Donna obsession. We have collected her magazines from the beginning and since having kids, I absolutely adore the annual Kids edition. B has visited her store in Sydney a few times (thanks for the SMS'd photos - very jealous!) and we both have our favourite Donna recipes that have become staples - like orange cake and jam drops. Anyway, this month's gorgeous biscuit cover picture had us both salivating. So many potential Christmas gifts!


The coconut and jam hearts were extremely yummy and very easy to make. Confession time: I ended up having to make two batches as we ate the first batch!! Little (and big) hands just kept going back for more and before we knew it, they were gone.

Coconut and jam hearts (from Donna Hay Magazine Dec/Jan 2012 issue)

125gg butter, chopped
1/2 cup caster sugar
1 egg
1 teaspoon vanilla extract
1 1/2 cups plain flour, sifted
1/2 teaspoon baking powder, sifted
1/2 cup desiccated coconut
icing sugar, for dusting
raspberry or strawberry jam


Place the butter and sugar in an electric mixer and beat until pale and creamy. Add the eggs and vanilla and beat until well combined. add the flour, baking powder and coconut and beat for a further 1 minute or until well combined. Refrigerate for 30 minutes or until firm.


Divide the dough into 2 equal portions and roll both portions out between 2 sheets of non-stick baking paper to 3mm-thick. Using a 7cm round cookie cutter, cut 12 rounds from the dough and place on a baking tray lined with non-stick baking paper.


Using a 4cm heart-shaped cookie cutter, cut hearts from the centre of half the rounds and discard (I just added these back to the dough mixture)


Bake for 8-10 minutes or until golden. Allow to cool. Dust the cut-out rounds with icing sugar. Spread the plain rounds with jam and sandwich with the cut-out rounds. Makes approx 12.


The biscuits were given as gifts and were a huge hit! I also made these fruit mince pies that you can see in this picture.

Enjoy

M
x

Saturday, 2 April 2011

Jam Drops: easy Saturday baking

Jam drops would have to be one of the easiest biscuits to make. I turned to Donna Hay's trusty Modern Classics 2 book for the recipe this time. They were certainly yummo but the jam 'hole' (for some reason that sounds rude) I made in the dough wasn't as deep when they finished baking as I would have liked. Nevertheless they had the expected buttery crumbly texture with oozy jam centres.

Is there a secret to making the jam hole deep and stay deep when baked? If there is, I'd like to know if anyone out there is listening. Maybe I had too much butter? Maybe make the hole wider? I tried a number of batches in different sizes as I made double the mixture the recipe calls for, but they all seemed to flatten out too much (well, for my liking). Anyway they tasted just fine and I used some of my batch as part of a birthday present for a family member - all nicely packed up in a jar. Happy Birthday Barb!


Kind of looks like a giant nipple right? Oops!!

Jam Drops - adapted from Donna Hay's Modern Classics 2

180g butter softened
1 cup caster sugar
1 egg
2 cups plain flour, sifted
1/2 tsp baking powder
jam to decorate (I used raspberry)

Preheat oven to 180 degrees. Place the butter and sugar in the bowl of an electric mixer and beat until light and creamy.


Add the egg and beat well. Stir through the flour and baking powder and mix to a dough. (Because I wasn't in the baking 'zone' and made a double batch, I used my dough hooks to get through mixing the flour and baking powder in).


Roll 2 teaspoons of the mixture into balls. Place on a baking tray lined with non-stick baking paper, allowing room for the biscuits to spread (and mine did spread!!!). Flatten slightly and press a finger into the middle of each ball of dough to make an indent.


Fill the holes with jam.


Bake for 10 minutes or until golden. Add a little more jam to the holes while the biscuits are hot (Totally do this - it's for your own good!). Cool on wire racks.

Makes about 60 according to Donna. According to me about 40 (think mine were bigger than 2 tsp's and I even made double the mixture).


Enjoy!

Bxx

PS. If anyone has any tips on making the hole stay as a hole - let me know!!

Tuesday, 22 March 2011

Gingerbread People

Cooking with the kids can be fun at times or very messy!!! My 3 cherubs LOVE getting their hands into everything. Licking the spoon would rate very highly on their radar but having just one spoon between 3 can sometimes cause riots in our place. Being a rainy afternoon, there was a little bit of cabin fever going around so we decided making gingerbread people would be a nice simple boredom busting activity. Plus the kids can eat the dough and everyone is happy!

This gingerbread recipe is a household favourite in our family from way back. I remember our mum making it and B even had us all making it for her wedding as a special gift for each guest.

The recipe is from The Big Book of Beautiful Biscuits from The Australian Women's Weekly (AWW). Nearly everyone I know has this book tucked away somewhere at the back of their mother or grandmother's cupboard, along with the Children's Birthday Cake Book. I had to purchase my copy off eBay as my mother won't part with hers (when mine arrived in the mail it even smelt of mothballs!!). I also suspect B nabbed mum's spare copy - thanks B!


You will need  (page 22 in AWW's The Big Book of Beautiful Biscuits)
125g butter
1/2 cup brown sugar, firmly packed
1 egg yolk
2 1/2 cups plain flour
1 teaspoon bicarbonate of soda
3 teaspoons ground ginger
2 1/2 tablespoons golden syrup  (I have found that you really need more butter and golden syrup just so the mix comes together, so I added extra 2 tbsp of golden syrup and made my butter 160g)

Royal Icing
1 1/2 cups icing sugar
1 egg white
4 drops of lemon juice
food colouring


Step 1
 Cream butter and sugar until light and fluffy, add egg yolk, beat well. Gradually add sifted dry ingredients and syrup, mix well, knead lightly. Divide dough into portions. Roll each portion between two sheets of greaseproof paper to 3mm thickness.


Step 2
Gently remove greaseproof paper from top. Cut out gingerbread figures with cutter. Remove any excess mixture around the cut-out figures.

Step 3 Lift the figures onto a lined baking tray. Bake in moderate oven 10 minutes. Cool on trays. Spoon royal icing into small plastic bag, snip off one corner to make a piping bag.

Royal Icing
Sift icing sugar. Beat egg white lightly in a small bowl, using a wooden spoon. Add icing sugar, one tablespoon at a time, beating well after each addition. When icing reaches piping consistency, beat in lemon juice and desired food colouring. Makes about 20.


Enjoy!

M xx